Install the SharePoint Web Parts
To install the Reveille SharePoint Web Parts, complete the following steps.
NoteReview and discuss the installation with the SharePoint administrator before installing the SharePoint Web Parts.
- Navigate to the <reveille installation path>\ReveilleSoftware\ Reveille\Support\WebParts directory on the Reveille server.
- Copy the ReveilleWebParts.wsp package to the SharePoint server that is a member of the SharePoint farm or a SharePoint standalone server.
- At the SharePoint Server, click the Start Menu, and run SharePoint Management Shell, which is a PowerShell command window.NotePowerShell must be started using Run as Administrator option.
- Execute the following command to add the Reveille wsp package to SharePoint from the directory of the ReveilleWebParts.wsp file.
Add-SPSolution C:\<path>\ReveilleWebParts.wsp - Deploy the Reveille Web Parts package.
- Log into the SharePoint Central Administration site.NoteYou must be logged in with a domain account with local administrator rights.
- Browse to System Settings.

- Select Farm Management.
- Select reveillewebparts.wsp.
- Click Deploy Solution. The following is displayed:

- Select the web application to deploy to, and then click OK to deploy.NoteThis may take several minutes because each SharePoint server in the SharePoint farm must be updated and IIS will be reset.
- Refresh the page to see that the solution has been successfully deployed.
- Log into the SharePoint Central Administration site.
- Activate the Reveille Web Parts site:
The deployed solution has to be activated for a given SharePoint site collection. To activate at the SharePoint site collection level:
- Log into the SharePoint site with administration rights.
- From the Top Level Site Settings menu, select Site Settings.

- On the Site Settings page, select Site Collection Features from the Site Collection Administration section.
- Activate the Reveille Web Parts by clicking the Active button.

- Repeat activation for each desired SharePoint site collection.
- Configure the Reveille Web Parts:
Configure the Reveille Web Part on the SharePoint site page. You must be logged into the SharePoint site with the proper rights to edit the site page.
- Navigate to the SharePoint site page, select Settings, and then click Edit Page.
- Select Insert.
- Under Categories, select Reveille Web Parts.

- Position the cursor on the site page to locate the Reveille Web Part insertion, and then select Add.
- Configure the web part by selecting the web part menu.
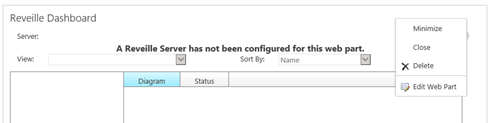
- Click Edit Web Part.
- Enter the following required information for the dashboard properties:

- Reveille Server host name or IP address. NoteThe Reveille server must be at version 6.7 or above level.
- Windows account user ID and password with proper access to desired Reveille Monitors and Groups.
Change other configuration options (refresh, title, default view, etc.) as desired.
- Reveille Server host name or IP address.
- Click Apply and then click OK. The site page will refresh with the new web part.

- Save and close the site page.
- Repeat the previous steps for each desired site page.
Was this helpful?
Please tell us why:
Thank you.